Showing posts with label cable. Show all posts

Tuesday, March 25, 2014

Technique Tuesday...

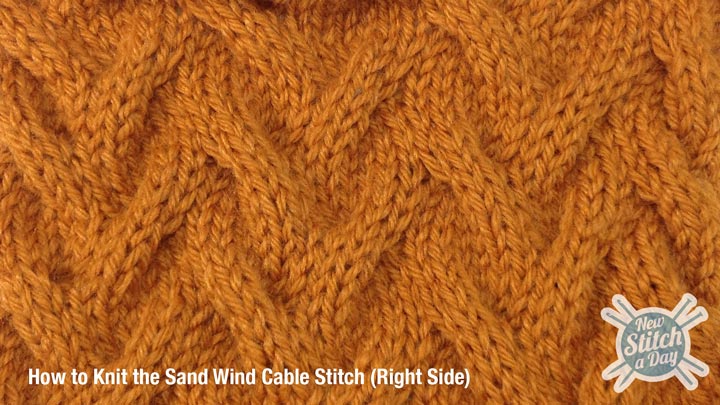
Today's technique is a beautiful cable technique and probably one of my favorites.  I especially love to use this stitch for hats, but it looks good on scarves and cowls too. 


You must have basic cable knitting skills to understand this technique.  Here are the instructions in case you do not know how to knit cables.  Cable 4 Front instructions, Cable 4 back instructions.  I also have included the written instructions to today's technique below the video.  Once again, video and instructions are from New Stitch a Day.


Skill: Intermediate
Cast On: Multiples of 12 + 6 (+ 2 for a selvedge stitch on each end)  If knitting in the round, do not cast on the selvedge stitches.
TECHNIQUES USED IN THIS STITCH:
Knit – k
Purl – p
Cable Six Front – C6F
Cable Six Back – C6B

Pattern Instructions:

Row 1 (RS): Knit
Row 2: Purl
Row 3: 1 edge st, *C6F, k6; rep from *to last st, 1 edge
Row 4: Purl
Row 5: Knit
Row 6: Purl
Row 7: 1 edge st, *k6, C6B; rep from *to last st, 1 edge st
Row 8: Purl
Repeat these 8 rows until you have reached your desired length.


Tuesday, March 11, 2014

Technique Tuesday, Cable Cast On...

Today's technique is the Cable Cast On.  The Cable Cast On is often found in your knitting patterns and is easier than it sounds.  This cast on is similar to the Basic Knitted Cast On, but the stitches are drawn in closer.  This method is not necessarily used to knit cables, but it does help prevent your edges and rib work from flaring out.


Skill: Beginner
Pattern:
Step 1: Take your yarn and make a slip knot, then place it on your knitting needle. Make sure there is few inches on your tail so you can sew it in later.
Step 2: Take your other needle in your dominant hand and insert the tip of the needle into the front leg of the stitch, knitwise. Insert the needle at an angle forming an “X”.
Step 3: With your non-dominant hand hold the needles together where they intersect.
Step 4: With your dominant hand, take the yarn connected to the yarn ball and wrap if around the bottom needle.
Step 5: Pull the yarn through the slip knot with the needle, making sure to stretch the yarn as you go, creating a large loop.
Step 6: Take the loop and place it on the main needle.
Step 7: With your dominant hand, insert the knitting needle between the first and second stitches at angle, again forming an “X”.
Step 8: Wrap the yarn around the bottom needle again.
Step 9: Pull the yarn through the gap in between the two stitches on the main needle, making sure to stretch the yarn, creating a large loop.
Step 10: Take the loop and place it on the main needle.
Repeat steps 7-10 until you have cast on the number of stitches required by our pattern.

Tuesday, February 25, 2014

Technique Tuesday...

The Large Horn Cable Stitch

Today's technique is a beautiful intermediate cable stitch that would be great for sweaters or blankets or even a big chunky cowl.  Before I learned how to knit cables I was very intimidated by them, they seemed quite scary to me.  I forced myself to learn the basic cable forward and cable back techniques and instantly was hooked, it was so easy and the work was beautiful.  If you haven't yet tried knitting cables, I urge you to try to today.

I have included a video for the Large Horn Cable Stitch by New Stitch a Day.  All of the videos on his site are very thorough and easy to follow along with.  If you go to New Stitch a Day, the written instructions are also included beneath the video for those of you that need to read them as well as watch.  I will include them here too.

TECHNIQUES USED IN THIS STITCH:

Knit Stitch- K
Purl Stitch- P

Cable Four Front (C4F) – Slip next 2 sts on needle onto a cable needle and hold in front of work, k2, k2 from cable needle.
Cable Four Back (C4B) – Slip next 2 sts on needle onto a cable needle and hold in back of work, k2, k2 from cable needle.
  
Cast on: worked over multiples of 16sts on a background of reverse stockinette stitch

Pattern Instructions

  1. Row 1:  (right side) k4, C4B, C4F, k4.
  2. Row 2:  P16.
  3. Row 3:  k2, C4B, k4, C4F, k2.
  4. Row 4:  P16.
  5. Row 5:  C4B, k8, C4F.
  6. Row 6:  P16.
Repeat rows 1-6 until you have reached your desired length.